Home

Basic Knots
Advanced Knotwork
Line Treatments
Analysis
Alternative Grids
Further Topics
Sources
Sample Grids
|
Home |
|
Basic Knots |
Advanced Knotwork |
Line Treatments |
Analysis |
||||
|
Alternative Grids |
Further Topics |
Sources |
Sample Grids |
To this point we've been simply using black to cover up the construction marks (dots, circles, or diamonds at the grid points) and filling in the bands with colors. The Celtic scribes certainly used this technique in the original manuscripts. They also used many other techniques to decorate the bands. Some of these are covered below.
Try increasing the circle diameters/diamond widths without changing the grid spacing to construct thinner bands, and making smaller circles/diamonds to help get wider bands.
 |
This pattern is from [Meehan2], originally from Durrow. Here is the original grid size, and a band generated using this template. |
 |
Here is a grid with larger diamonds generating a narrower band. |
 |
This grid uses smaller diamonds and, consequently, wider bands. Note that some spaces between bands disappear with wider band widths. Sometimes the bands will need to be adjusted to compensate for this effect. |
Besides changing the width, bands themselves were often decorated.
The band edges were often drawn in black, letting the background parchment show through. | |
Bands often had lines or dots running down the middle... | |
...or two narrow bands running on the sides of the band. | |
Finally, the knots were sometimes simply drawn with red dots alone against the parchment. |
Celtic work was incredibly colorful. Some knots were light on dark (as most of the examples), but some were dark on light backgrounds. Colored areas were used on the bands and in the middle areas (between the bands) as well. Even if a band was continuous, often more than one color was applied.
"Doubling" can be considered a line treatment that forms a
parallel double band from a broad interlace pattern; the two
new bands do not cross except where the original broad band
did. This form of interlacing was quite popular with the
scribes and was extensively used in both
Construction techniques developed by George Bain(see [BainG]) involved building the original wide interlaced band, then converting the edges of these bands into new, narrow, parallel bands, and finally fixing up the interlacing. This requires a lot of erasing and fixing. Doubling can be supported with the cell structures we've been using by following the procedure below:
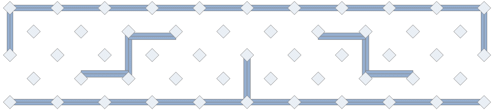
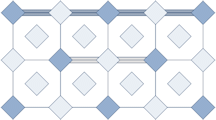
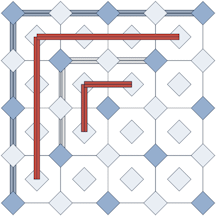
1. Draw original pattern on double-sized cells compared to the desired final results. This 10X2 cell pattern is taken from [BainI] page 101, and was originally from Lindisfarne Folio 11B.
| |
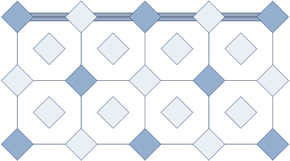
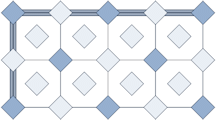
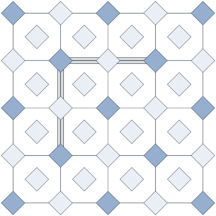
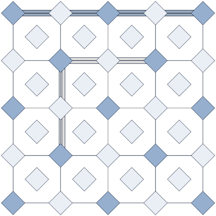
2. Build a set of "half-sized" cells between the original points. I used smaller than half-size diamonds for band spacing here to reflect the Lindisfarne style of doubling. See [BainI] pages 71-72 for further information and alternative construction techniques. On the illustration, the new cell diamonds are in green. Add back the original interruptions (extra "walls") pattern.
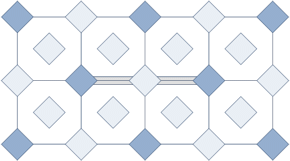
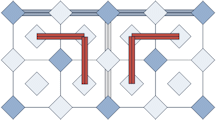
| 3. Add interruptions to the new patterns (in the half-sized cells)
based on the original, full-sized cell patterns. When converting from single
to double interlacing, there are eight possible patterns or cases to be
handled. In all the case descriptions, the single knotwork cells are in dark
blue, the doubled cells are light blue, edges are dark blue lines, the original
(single) interruptions (walls) are in grey, and the new, added, doubled
interruptions are in dark red:
|
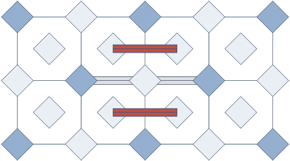
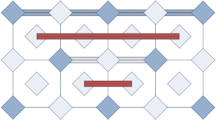
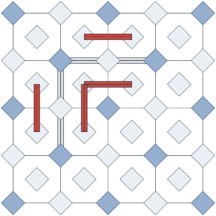
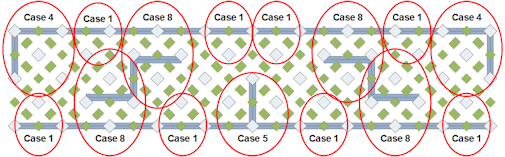
4. Determine, for each interruption and edge in the original, the doubled case that describes the interruption. For the Lindesfarne F11B pattern we're using as an example, the following figure shows the doubled case for each part:
| |
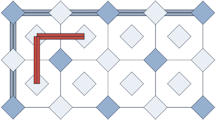
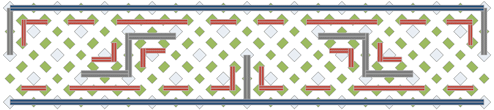
5. Add the new interruptions according to each case found. The added interruptions are shown in dark red.
| |
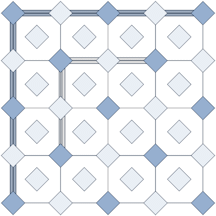
6. Interlace as usual. Curves will take a bit of extra planning in order to keep them parallel and at a constant width.
| |
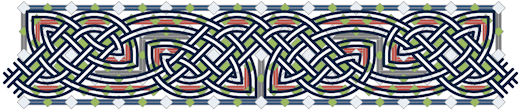
7. Color the bands as desired. The illustration is colored to highlight the continuity of the bands across the repeating, doubled pattern.
|
Also see other examples of doubling provided on the Celtic Art pages.