Home

Basic Knots
Advanced Knotwork
Line Treatments
Analysis
Alternative Grids
Further Topics
Sources
Sample Grids
|
Home |
|
Basic Knots |
Advanced Knotwork |
Line Treatments |
Analysis |
||||
|
Alternative Grids |
Further Topics |
Sources |
Sample Grids |
I've used the following techniques to determine the underlying cell templates for knots from a number of sources. The (rather involved) example below illustrates these techniques:
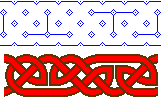
1. Here is an original scanned image, taken from Kells, folio 124R, at the top of the border design: |
|
|
|
|
2. Find the repeating patterns. I've outlined the repeating group from this image in red: |
|
|
|
|
|
|
3. Here is the repeating group isolated, and the band highlighted using image processing techniques. |
|
|
4. Look at the "holes" in the knots (outlined in red) to determine the underlying cell patterns. In this case, I started in the middle where the pattern was least broken (look for simple interlace patterns) and worked my way out. After the cell pattern starts to emerge, it becomes easier to complete it across the more complex areas. For borders concentrate on cell width; with panels the panel dimensions (width X height). |
|
|
5. Determine how the pattern is interrupted by observing the breaks in the overall interlace design. These are added in red on the illustration. |
|
|
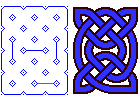
6. I've removed the original bands to more clearly see the underlying cell and wall pattern. This pattern uses 4X6 cells in the repeating group. |
|
|
7. I've now placed the wall pattern on a regular grid, set up for a narrow band pattern. |
|
|
8. Reviewing the wall pattern, I observe that this is a doubled version of a 2X3 cell pattern, as shown in the figure. For information on drawing doubled knotwork, please see the Line Treatments (Doubling) section of this tutorial. |
|
|
9. So, I now redraw the cells and wall patterns using the doubled grid. See the Sample Grids page for a sample of this grid. |
|
|
10. I interlace the design, just as the other knotwork examples in this class. |
|
|
11. This illustration shows the pattern colored with band and background shades taken from the scanned original. |
12. The template is extended to approximate the original panel design. |
|
|
|
|
13. Finally, the generated panel is resized to match the original, and compared. |
|
|
|
|
14. Not bad, but probably should have stuck with the original non-doubled style grid. :-) In addition, the Celtic scribes appeared to have used a variable width grid pattern and/or a pattern variance (the third repeat from the left does not have the same grid pattern as the other three). These are not unusual occurrences in the original materials. Below is a slightly modified version of the generated design that includes the pattern variance. Closer yet... |
|
|
|
|
I'm sorry to report that some existing works will "resist" this type of analysis. Panels and pages based on triangular grids, grids warped or adjusted to fit a particular space, or freehand knots will be difficult (and frustrating--trust me on this!) to analyze. For triangular knot construction, please see the Triangular Knotwork class page.
Some spiral- or circular-based knots are hard to reproduce using the rectilinear patterns found in cells. Some panels are based on circles rather than interlaces (especially some of the existing carved stones). Certain patterns need the cells turned 45° from the usual configuration.
In these cases, try to find the page/panel/border already analyzed-- see [Meehan2], [BainI], [BainG] from the class Bibliography, and don't give up. Use the draw and erase techniques rather than cells, but keep on trying until the pattern does what you want it to do.
And, Good Luck.
Many panels and borders are based on grids where the sides form a ratio of 3/4 rather than the square (1/1) grids used for the bulk of this class. George Bain (in [BainG]) calls this the "Pictish proportion". The example below illustrates a template with 3/4 proportion:
 |
The usual square grid, with the Durrow template and a sample band treatment. |
 |
The 3/4 ratio grid (turned to make a 4/3 grid in this example) with the same Durrow pattern set up. |
 |
The template above with interlacing added. The bands are interlaced just as in the square grids, but you need to watch the band angles so they meet up with the grid guides. |
 |
The band filled in and colored. Using 3/4 ratio grids can help if you need to squeeze in a certain number of grid squares into a space that is not quite big enough. The original Celtic scribes used this technique in several instances; they even used odd (neither 1/1 or 3/4) grid sizes to adjust border spacing. |
Aim for "interesting" work; make it pleasing to your eye. Study existing Celtic knotwork (see the references from the class Bibliography) and attempt to reflect similar themes and overall designs (e.g., try for a single band running through the entire panel/border...) Watch out for "loops", and try to get "knots" instead.
 |
Example of a pattern with a "loop". The left shows the underlying grid (3X4 in this case) and the right shows the bands. The "loop" generated is shown in red. |
 |
Similar pattern modified to make a "knot". The left shows the added "wall" (highlighted). The right side shows the drawn and colored band, with the loop removed. |
One way to begin - and my favorite method for doodling during meetings :-) - is to sketch the underlying cell patterns and interruptions using graph paper. I then use the "bubble" technique (see Basic Interlacing Construction) to regularize the band width, then draw out the interlace by eye. This allows a quick review of the pattern, and allows me to remove obvious loops and clumsy areas of the pattern before formally drawing it out.