Home

Basic Knotwork Topics
Advanced Knotwork
Other Subjects
Bibliography/Sources
Sample Grids
|
Home |
|
Basic Knotwork Topics |
Advanced Knotwork |
Other Subjects |
|||
|
Bibliography/Sources |
Sample Grids |
I've used the following techniques to determine the underlying cell templates for knots from a number of sources. The simple example below illustrates these techniques:
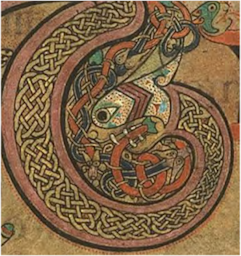
1. Find an original knotwork image to work with. Here is an original scanned image from the Book of Lindisfarne, folio 211r. : |
|
|
|
|
2. Find a repeating pattern. I've outlined the repeating group from this image in red: |
|
|
|
|
|
|
3. Isolate the repeating pattern. |
|
|
4. Try to find the underlying basic cell grid. To do this, focus on the "holes" between the bands. |
|
|
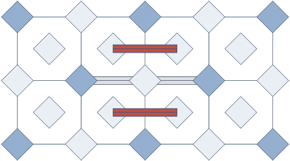
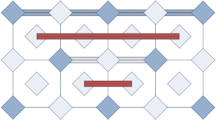
5. Determine the interruptions ("walls" and/or "corners" to be added). These are added in red on the illustration. |
|
|
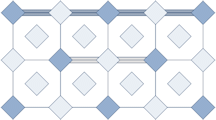
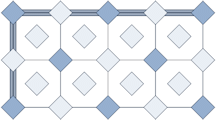
6. And then isolate the full template without the scanned knotwork. This pattern uses 3X6 cells in the repeating group. |
|
|
7. Interlace the template using the usual techniques. |
|
|
8. The original had a band edge treatment with two narrow bands running on the sides of the major band. So, here is a version with that treatment. |
9. Check the interlace, against the original. I've tweaked the colors to better analyze the match. |
|
|
|
|
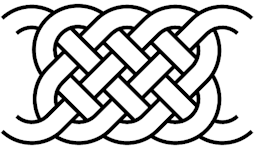
Here's a more involved example:
1. Here is an original scanned image, taken from Kells, folio 124R, at the top of the border design: |
|
|
|
|
2. Find the repeating patterns. I've outlined the repeating group from this image in red: |
|
|
|
|
|
|
3. Isolate the repeating group. I've highlighted the band using image processing techniques. |
|
|
4. Look at the "holes" in the knots (outlined in red) to determine the underlying cell patterns. In this case, I started in the middle where the pattern was least broken (look for simple interlace patterns) and worked my way out. After the cell pattern starts to emerge, it becomes easier to complete it across the more complex areas. For borders concentrate on cell width; with panels the panel dimensions (width X height). |
|
|
5. Determine how the pattern is interrupted by observing the breaks in the overall interlace design. These are added in red on the illustration. |
|
|
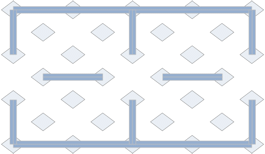
6. I've removed the original bands to more clearly see the underlying cell and wall pattern. This pattern uses 4X6 cells in the repeating group. |
|
|
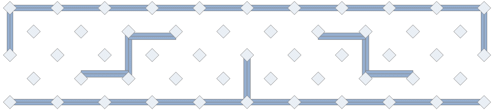
7. I've now placed the wall pattern on a regular grid, set up for a narrow band pattern. |
|
|
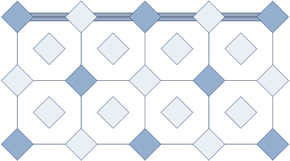
8. Reviewing the wall pattern, I observe that this is a doubled version of a 2X3 cell pattern, as shown in the figure. For information on drawing doubled knotwork, please see the Doubled Knotwork section of this tutorial. |
|
|
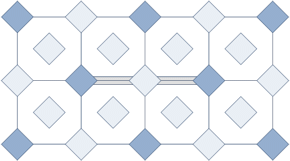
9. So, I now redraw the cells and wall patterns using the doubled grid. See the Sample Grids page for a sample of this grid. |
|
|
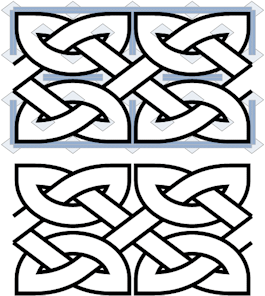
10. I interlace the design, just as the other knotwork examples in this class. |
|
|
11. This illustration shows the pattern colored with band and background shades taken from the scanned original. |
12. The template is extended to approximate the original panel design. |
|
|
|
|
13. Finally, the generated panel is resized to match the original, and compared. |
|
|
|
|
14. Not bad, but probably should have stuck with the original non-doubled style grid. :-) In addition, the Celtic scribes appeared to have used a variable width grid pattern and/or a pattern variance (the third repeat from the left does not have the same grid pattern as the other three). These are not unusual occurrences in the original materials. Below is a slightly modified version of the generated design that includes the pattern variance. Closer yet... |
|
|
|
|
I'm sorry to report that some existing works will "resist" this type of analysis. Panels and pages based on triangular grids, grids warped or adjusted to fit a particular space, or freehand knots will be difficult (and frustrating--trust me on this!) to analyze. For triangular knot construction, please see the Non-Square Grids section below.
Some spiral- or circular-based knots are hard to reproduce using the rectilinear patterns found in cells. Some panels are based on circles rather than interlaces (especially some of the existing carved stones). Certain patterns need the cells turned 45° from the usual configuration.
In these cases, try to find the page/panel/border already analyzed-- see [Meehan2], [BainI], [BainG] from the class Bibliography, and don't give up. Use the draw and erase techniques rather than cells, but keep on trying until the pattern does what you want it to do.
And, Good Luck.
Getting border patterns to properly turn corners is fairly tricky--to the best of by knowledge there is no consistent, stereotypical method for generating patterns that properly miter (that is, that turn corners) without drastically changing the underlying patterns, introducing loops or extra bands, etc.
You can try to either "slide" or rotate existing cell patterns into the corner, or try a different pattern that fits better into the corner space. Please expect some very strange bands (even those outside the cell boundaries) when a complex pattern turns a corner!
The same sort of pattern modifications can be used for "T" and cross-intersections. See the Simple Knbotwork Borders section below for why you might need these.
The following shows an example of a "sliding" type of pattern:
|
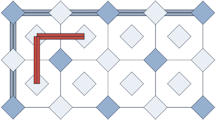
1. To the left is the underlying panel template and band treatment, from [BainI], page 43, based on a pattern found in Lindisfarne, Folio 27. |
|
2. This figure shows the template extended (by removing parts of the two end walls) to form a border pattern. |
 |
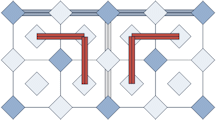
3. This figure shows the template shifted and rotated to allow the corner to be turned. Then walls were removed to keep the pattern constant. |
 |
4. Finally, the bands were formed and filled in as usual to build the final panel. This can be further rotated and extended to form rectangular mitred panels of any desired size. |
The second example, taken from Kells, shows a template modification allowing the pattern to "turn" a corner.
|
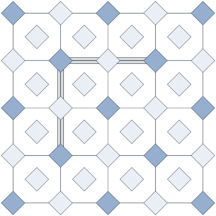
1. To the left is the underlying panel template and band treatment, from [BainI], page 103, based on a pattern found in Kells, Folio 124R. It is a 2X4 cell pattern, with the repeating group offset by a half cell. |
|
2. This figure shows the original template flipped and used in a corner pattern. There is not a smooth way to shift and reconnect the pattern as in the one above. |
 |
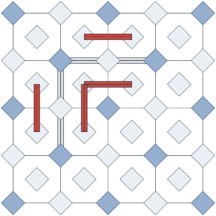
3. This figure shows the wall to be removed (in red) to smooth out the corner turn. When doing these on your own, try to not add a loop, but keep the underlying pattern going as much as possible. |
 |
4. Finally, the bands are formed and filled in as usual to build the final panel. As with the first example, this can be further rotated and extended to form rectangular mitred panels of any desired size. |
Interlaced panels can be used to fill in areas of a page, like complex borders, between other forms, or inside of large initial caps, etc. The basic design concept is to divide the required space into cells of appropriate scale, and add breaks to make things "interesting" (i.e., single band, no loops, etc.).
The overall design concepts for these filled-in pages is beyond the scope of this tutorial. Most of these "carpet pages" from original sources use a broad mix of interlace, zoomorphics, spirals, keywork, etc. Please review the original works found in the Tutorial Bibliography for examples and inspirations. That being said, the following example shows a simple way to divide up a page based on a pattern found in Lindisfarne, Folio 27.
 |
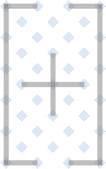
1. Determine the area you'll need to cover. Determine the overall border outlines. A cross-shaped border like this is quite common in the original sources. Of course, many of them were Gospels, after all! |
 |
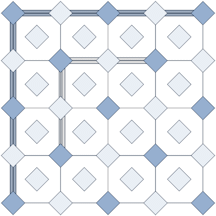
2. Start with the basic Lindisfarne, Folio 27 cell pattern. |
 |
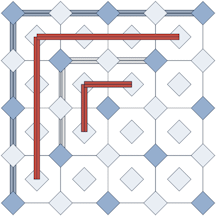
3. Develop the corner template and layout as described in the Pattern Modifications into a Corner section above. Note that you might need both a left-hand and right-hand version. |
 |
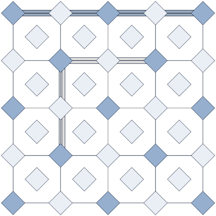
4. Develop (if needed) adapted version of the template to allow it to fit into different page boundary sizes. In this example, we needed a corner that was a bit shallower, so developed the template shown. |
 |
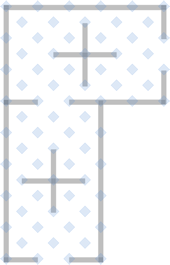
5. In a similar fashion, develop templates for the "T" intersections you'll need. Again, you might need a different template for the upper and lower T intersections... |
 |
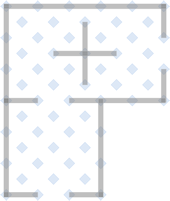
6. ...and the "X" (crossing) in the middle. |
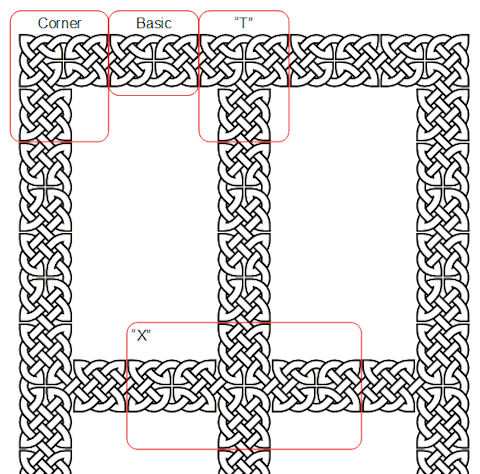 |
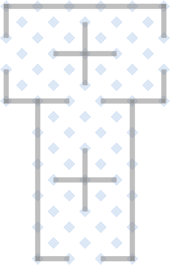
7. Line up the templates and interlace. The example shown gives you an idea of how the different templates described above were used. The "X" template is rotated 90 dgrrees in this example to better fit the border needs. |
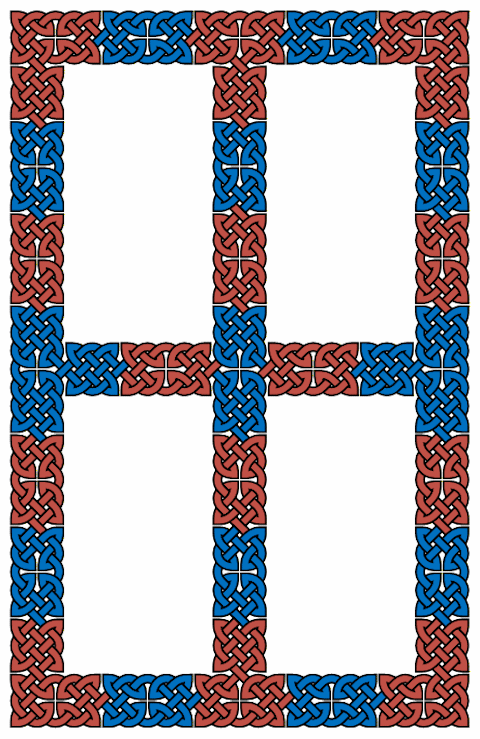 |
8. Finally, color in the bands however you like. For information on band width colors, widths, etc. (please see the tutorial section on Line Treatments). |
You can also use pre-defined panels (see [BainG] or any of the other listed sources), if the area you're trying to fill "factors" properly--that is, if the number of cells filling the space you need to cover is an even multiple of the number of cells in the original pattern. Existing examples used different interlace patterns on different sections of the same page. In fact, some examples use knots, key patterns, zoomorphics, and spiral patterns on the same page.
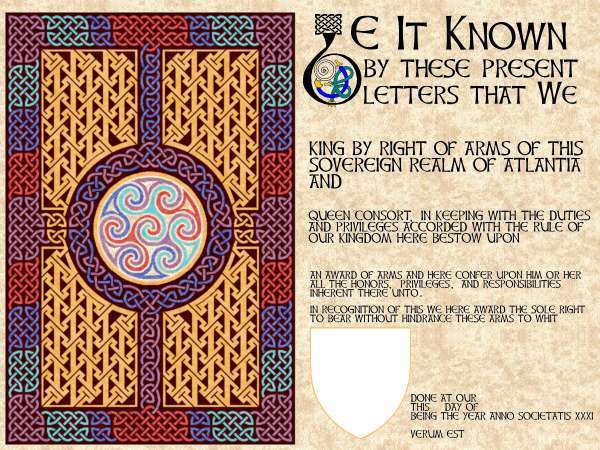
There are particularly good examples in [Meehan2] (pages 72-102), [BainI] (Chapter 10), [BainG] and, of course, any good facsimiles of the actual manuscripts. A (not terribly good :-) example of a draft SCA-style scroll study using this technique can be seen in the aoa9p1.jpg (81KB) file.
Also, please see other examples of space filling patterns provided on the Celtic "Art" pages.
"Doubling" can be considered a line treatment that forms a
parallel double band from a broad interlace pattern; the two
new bands do not cross except where the original broad band
did. This form of interlacing was quite popular with the
scribes and was extensively used in both
Construction techniques developed by George Bain(see [BainG]) involved building the original wide interlaced band, then converting the edges of these bands into new, narrow, parallel bands, and finally fixing up the interlacing. This requires a lot of erasing and fixing. Doubling can be supported with the cell structures we've been using by following the procedure below:
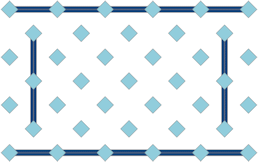
1. Draw original pattern on double-sized cells compared to the desired final results. This 10X2 cell pattern is taken from [BainI] page 101, and was originally from Lindisfarne Folio 11B.
| |
2. Build a set of "half-sized" cells between the original points. I used smaller than half-size diamonds for band spacing here to reflect the Lindisfarne style of doubling. See [BainI] pages 71-72 for further information and alternative construction techniques. On the illustration, the new cell diamonds are in green. Add back the original interruptions (extra "walls") pattern.
| 3. Add interruptions to the new patterns (in the half-sized cells)
based on the original, full-sized cell patterns. When converting from single
to double interlacing, there are eight possible patterns or cases to be
handled. In all the case descriptions, the single knotwork cells are in dark
blue, the doubled cells are light blue, edges are dark blue lines, the original
(single) interruptions (walls) are in grey, and the new, added, doubled
interruptions are in dark red:
|
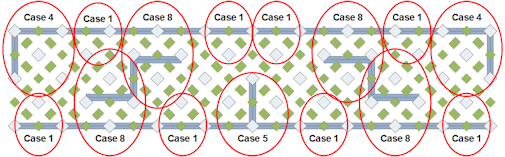
4. Determine, for each interruption and edge in the original, the doubled case that describes the interruption. For the Lindesfarne F11B pattern we're using as an example, the following figure shows the doubled case for each part:
| |
5. Add the new interruptions according to each case found. The added interruptions are shown in dark red.
| |
6. Interlace as usual. Curves will take a bit of extra planning in order to keep them parallel and at a constant width.
| |
7. Color the bands as desired. The illustration is colored to highlight the continuity of the bands across the repeating, doubled pattern.
|
Also see other examples of doubling provided on the Celtic Art pages.
Many panels and borders are based on grids where the sides form a ratio of 4/3 rather than the square (1/1) grids used for the bulk of this class. George Bain (in [BainG]) calls this the "Pictish proportion". The example below illustrates developing an interlaced panel using a template with 4/3 proportion:
1. |
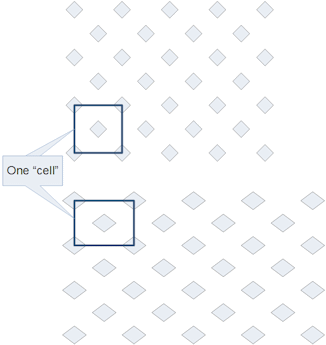 |
This shows both a square (top) and 4/3 ratio (bottom) grid, highlighting one "cell". |
2. |
 |
This illustrates the basic 1-1 (square) ratio proportion, using a pattern from the Maiden Stone (also called "Double Stafford Knot"). |
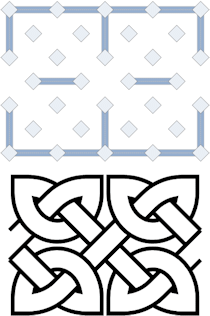
3. |
 |
Here is the 4/3 ratio grid with the same Maiden Stone pattern set up. |
4. |
 |
Here is the template above with interlacing added. The bands are interlaced just as in the square grids, but you need to watch the band angles so they meet up with the grid guides. Using 4/3 ratio grids can help if you need to squeeze in a certain number of grid cells into a space that is not quite big enough and more square grids are not working either. The original Insular Celtic scribes used this technique in several instances; they even used odd (neither 1/1 nor 4/3) grid sizes to adjust border spacing. |
Many Celtic-style patterns were developed using grids based on triangles rather than squares or rectangles. These seem to be (for some reason) especially popular on the many carved standing stones in the British Isles--especially on those in eastern Scotland. The most common grid seems to be one based on a right triangle, though some are based on equilateral triangles, and-- inevitably--some are based on irregular triangles. It is the right triangular grid we will use for the following tutorial examples.
The following example is for a simple triangular knot taken from [BainG] page 47 and [BainI] page 86. The original source for the pattern is probably the Ulbster Stone.
1. |
 |
This is the grid used for the knot. (Please see the Basic Interlacing Construction page for information on the grid patterns used...) [BainI] would refer to this as a 4n grid--it uses four divisions across the long side of the triangle. You should experiment with different amounts of cells across the long side. The original artists used just enough cells to fit their pattern--a very tight grid. Four is about as small as one can go... |
2. |
 |
To build this simple pattern, first sketch in the corners of the triangle. Size the bands as you would for the usual knotwork pattern--watch the width of the band that moves across the top of the triangle as it can be tricky to size properly. |
3. |
 |
This view shows how the corners are connected for this pattern. Unlike with knotwork patterns (see the Basic Interlacing Construction page for details), I've always had to draw the band edges first and then erase the overlaps while interlacing. |
4. |
 |
After interlacing the bands show the common over-under pattern of all knotwork. |
5. |
 |
Finally, the bands are colored and the background darkened. As with any knotwork pattern, the bands can be treated in a number of ways. See the Line Treatments tutorial section for details. |
As with other knotwork styles, the line widths can be varied by using the narrow or wide grid types. Please see the Line Treatments tutorial section for further information.
A simple square panel can be formed by slightly modifying the grid pattern used above and repeating it to form a square. An example follows:
1. |
 |
This view shows the pattern sketched in. The "inside" corner pattern was changed to make the bands "flow" over and under rather than turn the corner as in Step 2 above. |
2. |
 |
Connect the corners and interlace, as in Step 4 above. |
3. |
 |
This shows the pattern repeated to form a square. On the computer I simply copied, turned the copy 90 degrees, and pasted it back four times. By hand, one duplicates the grid and interlaces each of the four separately. Remember that the middle interlace drives the rest of the pattern, so do it first. |
4. |
 |
Finally, color in the band and background, or use another band treatment of your choice. |
I've found that most of these types of patterns look better when originally built on a wide grid. Please see the Sample Grids page for information. The following, more complex example (based on a pattern from the Dunfallandy Stone, using a pre-analyzed template from [BainG] page 41, Plate F.2) illustrates this technique:
1. |
 |
The grid for this pattern is 8 cells wide across the top. |
2. |
 |
The Dunfallandy pattern is more complex, so I've used "walls" to represent the places where bands split and curve. This is similar to the techniques used in the Interrupted Interlacing section of the Introductory Class. I've also sketched in the corner bands. In this pattern note that bands go "through" the sides of the triangle. |
3. |
 |
As with the simple patterns, I've added the bands and interlaced. With this more complex design, you can see how the interlacing is related to standard, square knotwork--over-then-under, the bands "turning" at walls and corners. With wide bands like this, you need to really watch the width of the bands so they remain constant. Things do get tight! |
4. |
 |
As before, I copied and repeated the pattern in Step 3 with 90 degree turns to form the square found on the original stone. Use the same techniques as in the simple panel above. |
5. |
 |
This shows the bands and background colored in. |
One can combine triangular panel sections into borders using the following technique (illustrated with a pattern from the Britford Stone):
1. |
 |
This shows one fourth of the total Britford pattern. This could be repeated and turned to form a square as with the Dunfallandy pattern used in the previous section. |
2. |
 |
In this view I've flipped the pattern over and connected it to the original. It was fairly easy to do this, since the band connections lined up. If they don't line up naturally, the pattern will have to be modified or shifted to make them connect. |
3. |
 |
For this border I had to put in a little place-holder knot to make it come out square on the end. Should have worked harder on this, since it makes a "loop" in the pattern :-( On some of the other triangular knotwork borders I put in a small zoomorphic "lizard" head and tail to complete the pattern. Please see my Celtic "Art" pages for more examples. |
4. |
 |
I added a free-form knot on the other end as well... |
5. |
Starting with the pattern from step 3, I can add step 2 sections 'till the pattern gets as long as I need, then complete he border with a step 4 section. The result is shown below: |

6. |
Finally, I colored in the bands and backgrounds. As usual, you can use any band treatment desired. The result using simple colored bands is shown below: |

7. |
 |
Since the triangular patterns naturally turn 90 degrees, it is fairly easy to have a triangular knotwork border turn corners. A pattern for the corner is shown here. It can be combined (flipped and rotated as well) with patterns from steps 2-4 above to form a border of about any shape desired. |
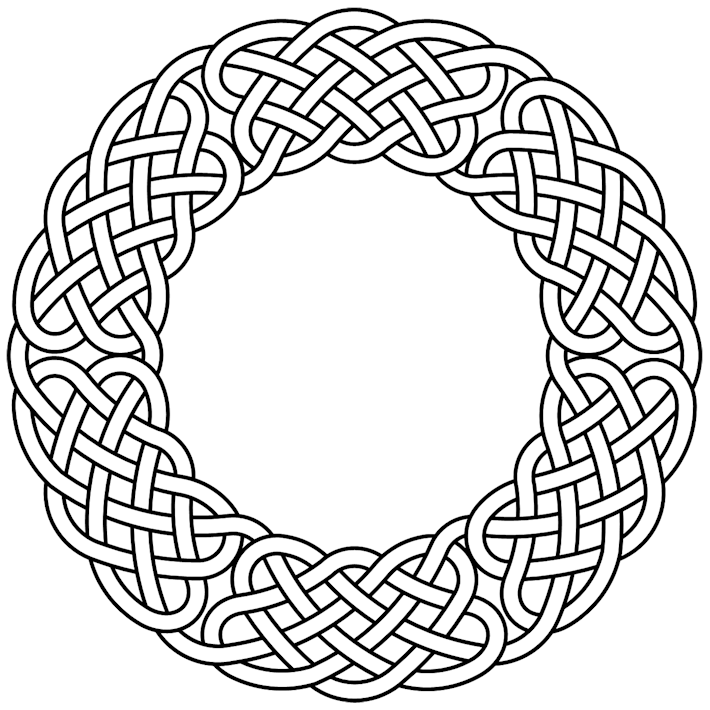
An extreme example of "non-square" grids are those used in the
construction of "annular" knotwork. An "annulus" is a fancy
mathematical word for a doughnut- or ring-shaped two-dimensional
region. That is, one that looks like: ![]()
So, annular knotwork is based on the regular interlace patterns we've been using, adapted to fill in an annular ring. The following technique provides an example of adapting a linear knotwork pattern to an annular area:
1. |
 |
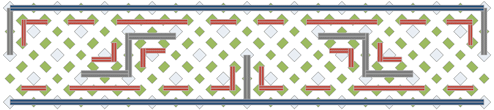
Determine the starting pattern. In this case we'll be using a pattern from the Book of Kells Folio 124R that (appropriately) was used in an annular area filling in an initial letter. |
2. |
  |
Develop via analysis (or look up) the underlying interlace and cellular pattern (a 4X3 cell design in this case). |
3. |
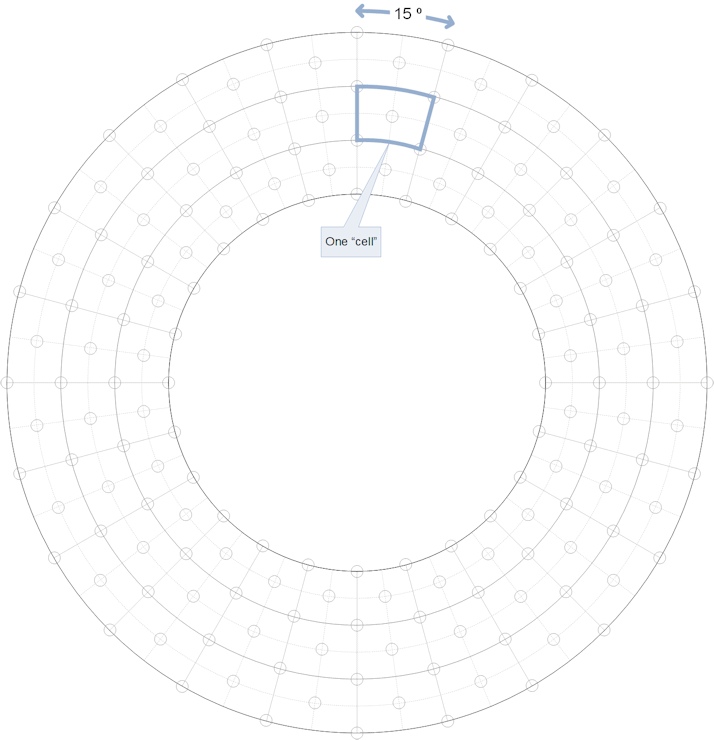
Figure out how many cells you'll need. Let's say we want six repeats of the pattern around the whole annular area. Since the pattern we're using is four cells wide, we'll need 6 (repeats) x 4 (cell width) or 24 cells around the whole. So, each cell will be 360 (degrees in a circle) / 24 (cells around) or 15 degrees wide. | |
4. |
Draw the initial grid. It really helps to have a computer drawing package to perform this step, let me tell you! It might take a few tries to get the cells about the right size. You will need to adjust the radius of the inner and outer boundaries of the annular region so that the cells you'll be drawing are fairly "square" (that is the top-bottom distance is about the same as the left-right distance. The following shows the whole annular grid for this pattern, showing the 15 degree cell spacing and highlighting a single annular cell: | |
|
| |
5. |
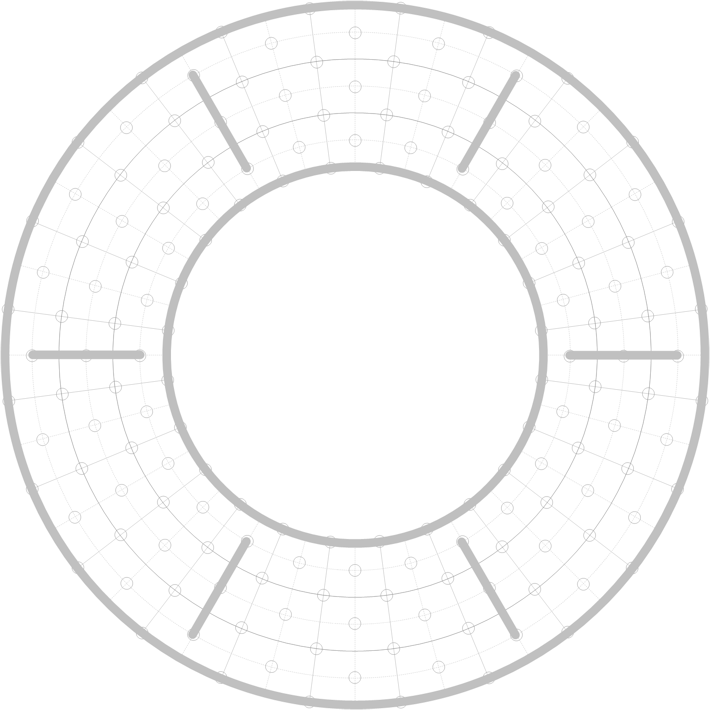
Now, add the cellular pattern walls and interruptions, repeating these six times around the circle: | |
|
| |
6. |
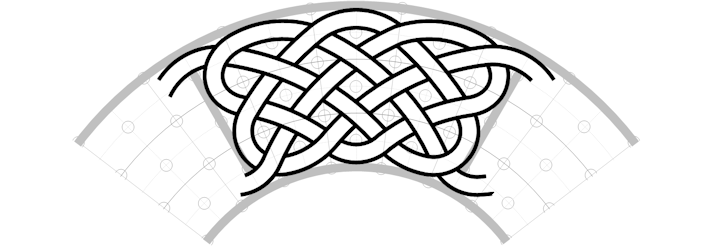
Interlace one of the six segments (we'll start at the top center for this example). The interlacing is done just like the linear knotwork we've done before, though you'll need to curve the bands to fit into the annular area to be covered. | |
|
| |
7. |
Finally, repeat the interlacing for the other five segments, using any band treatment desired: | |
|
| |
Try one of these on your own!


